After trying out numerous paid and free trip planning tools and applications, Google's offerings have stood out as top-notch for creating a smooth travel experience (and they're free). Google My Maps allows you to unleash your creativity by adding markers to a map, using custom icons to represent those markers, and plotting a driving route between them!
Why Choose Google My Maps?
- Google Maps has emerged as the go-to option for discovering nearby attractions. Despite trying out apps like Roadtrippers for trip planning, I consistently found myself reverting back to Google Maps due to its extensive database of stores, coffee shops, businesses, rental locations, campgrounds, and more. The platform's features such as reviews, user photos, street view, and others set it apart from the rest!
- You can utilize different symbols on the map to represent the various types of attractions. For instance, I use the tent icon for campgrounds, the trailhead icon for hiking trails, and the fork and knife icon for restaurants, making it easy to identify and navigate through the map.
- The integration of driving directions within the software simplifies itinerary creation. This functionality helps me gauge driving times and visualize the most efficient route for my trip based on the planned stops. You can select the major points or every point, making for more flexibility than other apps/software.
- Your trip details are readily available on your phone through the Google Maps allowing for offline viewing! This particular feature is my favorite and has led me to exclusively rely on Google for all my trip planning needs. This helps me get on my way quicker which driving directions to my next stop at my fingertips!
How to Get Started
- Head over to Google My Maps and use your Google log-in or create a google account.
- Use the "Create a New Map" button to open a new map.
 (FYI - all of the data for the map will be stored in Google Drive).
 - Name your map by clicking the "Untitled Map" title and changing it.
How to Use Layers
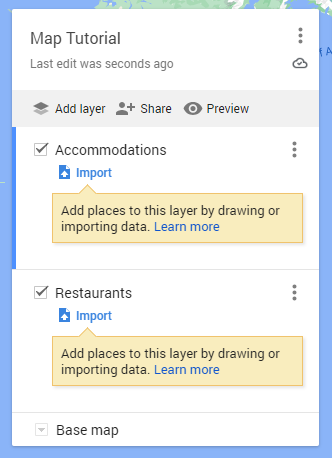
- Every new map opens with one layer. Change the name of this layer by clicking on the words "untitled layer."
- Layers dictate how icons are symbolized. I typically start a map by renaming the untitled layer to "Accommodations" and adding all of the campgrounds of interest in the area I wish to travel.
- You can turn a layer off to hide it from the map by clicking the check box next to the layer. Re-check it at any time to add it back!
How to Add Points to a Layer
- Add a point to the map using the search tool and clicking "add to map." If you only have one layer, it will automatically add the point to that layer. If you have multiple, ensure the layer you want to point to be put in is selected by clicking on it.

- You will know which layer is highlighted by whether or not there is a blue vertical line next to the layer. In the image below, the Accommodations layer is selected.
- If you are unable to locate a destination, but know its location on the map, you can add a 'marker' to the map. This is the
 symbol under the search bar.
Changing the Symbols on the Map
- Each layer can be symbolized differently but will automatically be symbolized using "Individual Styles." This simply means that each point can be changed to a different icon and different color within the same layer.
- To change the way points are symbolized, click "individual styles" and decide between the following:
- Uniform Style: all points added to the layer will use the same icon and color scheme. I use this for my campground layer to make all campgrounds symbolized by a tent icon. This saves time, because if I left the settings on individual styles, I would have to change each point to a tent and change the color manually for each campground.
- Sequence of Numbers: This style will assign each point added as a number. This can be helpful if you would like to view each stop on your trip in order. I used this recently for a trip to Zion to number the shuttle stops on my map in the same manner that the NPS does.
- Changing the symbol and color of an icon is quite easy! Simply hoover over the point from within the layer view and click on the paint bucket icon.

- Not seeing the icon that you want? You can add custom icons from the 'choose an icon' page. Simply upload an image and it will remain in your recently used icons for future use!
Calculating an Efficient Route
- Once you have a good idea of what stops you will be taking, you can use the 'Add Directions" tool under the search bar to create a route on the map.
- This will create a new layer. Input the major points along your trip, or each point, and a driving route will appear on your map. Click the three vertical dots on the layer to view step-by-step driving instructions and mileage total.
- This is highly integrated with Google Maps and thus much more accurate than other apps and trip planning software.
Using the description function
- Each point on the map can hold additional information that you can reference during your trip. I put All Trails links for my hikes, links to my Google Drive where reservation details are stored, and other reminders in the descriptions of items.
- For example, I put fishing regulations for different areas of Teton National Park in my trip map and used the fish symbol, so I could easily reference it while on the road.
Sharing Trip Details
- Google Drive lets you save documents for offline viewing. I do this for every trip! You never know how good cell reception will be until you're there and it is better to be safe than sorry. I download my itinerary, my reservations, park maps, etc.!
- Open Drive on your phone and navigate to the folder containing all of your trip documents.
- Click on the three horizontal dots next to each document and select 'make available offline.'
- Share your Map with your travel buddies! I plan most of the trip on my own, but my partner likes looking for restaurants. Sharing the map with her lets me know she isn't going to pick restaurants far away from our activities!
- From your Google My Map there is a share button under the map name and next to the 'add layer' button. You have two options for sharing: you can send a link or make it accessible via Google Drive.
- I prefer the second option, as you can save it in your trip folder to make accessing everything a breeze and the other individuals will be able to access it from the Google Map app on their own devices!
Other Useful Features
- The measure distance tool is not helpful for counting driving mileage; however, I have used this tool many times for estimating how long a kayaking trip may be (works best on lakes, but not so well on windy rivers)
- Importing data is possible and I have used this in the past to add specific coordinates that I had in an excel spreadsheet.
- Exporting data into a shapefile is possible if you would like to use the locational data in another mapping program such as QGIS or ArcGIS.
- Add your photos to the point description to create an interactive scrapbook of your trip!